
Na Vuong
September 28, 2024
•
20 min read

Maintaining data integrity is vital for any application, and schema validation in Retool makes it easy to enforce data rules. This blog offers a clear guide to mastering schema validation, ensuring your applications are consistent, reliable, and error-free.
Schema-based validation is the practice of defining a set of rules that govern the structure and content of data inputs. A schema serves as a blueprint for validation, outlining what is required for each field, permissible values, and interdependencies among fields. This approach centralizes validation logic, making it easier to manage complex data structures and enforce business rules consistently.
Schema-based validation is essential for several reasons:
Retool is a powerful platform for building internal tools, which means we work with form all the time, schema-based validation empowers Retool users to:
In retool, we can add a library (that I built it myself while working on several project that involve a lot of form and data consistency - called Validation) using this URL:
https://raw.githubusercontent.com/hctxnhan/Validation/refs/heads/main/dist/validation.umd.min.js

To implement schema-based validation in Retool, follow these steps:
Here’s an example schema that validates user input for a registration form:
1const exampleSchema = (data) => ({
2  name: [
3    {
4      validate: [
5        validation.STRING.isRequired,
6        validation.STRING.type,
7        validation.STRING.minLength(3),
8        validation.STRING.maxLength(20),
9      ],
10    },
11  ],
12  age: [
13    {
14      validate: [
15        validation.NUMBER.isRequired,
16        validation.NUMBER.type,
17        validation.NUMBER.minValue(18),
18      ],
19    },
20  ],
21  birthDate: [
22    {
23      validate: [
24        validation.DATE.isRequired,
25        validation.DATE.type,
26        validation.DATE.isPast,
27      ],
28    },
29  ],
30  isMale: [{ validate: [validation.BOOLEAN.isRequired, validation.BOOLEAN.type] }],
31  idNumber: [
32    {
33      validate: [
34        validation.STRING.type,
35        validation.STRING.isPattern(/^[0-9]{10}$/),
36      ],
37      when: [validation.$OTHER("age", validation.NUMBER.minValue(18))],
38    },
39    {
40      validate: [validation.STRING.isEmpty],
41      whenNot: [validation.$OTHER("age", validation.NUMBER.minValue(18))],
42    },
43  ],
44  email: [
45    {
46      validate: [
47        validation.STRING.isRequired,
48        validation.STRING.type,
49        validation.STRING.isEmail,
50      ],
51    },
52  ],
53  url: [{ validate: [validation.STRING.type, validation.STRING.isUrl] }],
54  assets: {
55    $beforeAllWhen: [validation.$OTHER("age", validation.NUMBER.minValue(18))],
56    cars: [
57      {
58        validate: [
59          validation.ARRAY.isRequired,
60          validation.ARRAY.type,
61          validation.ARRAY.minLength(1),
62          validation.ENUM.oneOf(["toyota", "honda", "ford"]),
63        ],
64      },
65    ],
66    carTax: [
67      {
68        validate: [
69          validation.NUMBER.isRequired,
70          validation.NUMBER.type,
71          validation.NUMBER.minValue(100),
72          validation.NUMBER.isInteger,
73          validation.NUMBER.isPositive,
74        ],
75        when: [
76          validation.$OTHER(
77            "assets.cars",
78            validation.ARRAY.type,
79            validation.ARRAY.minLength(1),
80          ),
81        ],
82      },
83    ],
84    max: [
85      {
86        validate: [
87          validation.NUMBER.isRequired,
88          validation.NUMBER.type,
89          validation.NUMBER.isInteger,
90          validation.NUMBER.isPositive,
91        ],
92        when: [validation.$OTHER("assets.min", validation.NUMBER.type)],
93      },
94    ],
95    min: [
96      {
97        validate: [
98          validation.NUMBER.isRequired,
99          validation.NUMBER.type,
100          validation.NUMBER.minValue(0),
101          validation.NUMBER.maxValue(lodashGet(data, "assets.max")).mgs(
102            "Can not be more than max",
103          ),
104          validation.NUMBER.isInteger,
105          validation.NUMBER.isPositive,
106        ],
107        when: [validation.$OTHER("assets.max", validation.NUMBER.type)],
108      },
109    ],
110  },
111  numOfFollowers: [
112    {
113      $beforeAllWhen: validation.$OTHER(
114        "url",
115        validation.STRING.type,
116        validation.STRING.isUrl,
117      ),
118    },
119    {
120      validate: [
121        validation.NUMBER.isRequired,
122        validation.NUMBER.type,
123        validation.NUMBER.between(10000, 500000),
124      ],
125      when: [validation.$OTHER("age", validation.NUMBER.minValue(18))],
126    },
127    {
128      validate: [
129        validation.NUMBER.isRequired,
130        validation.NUMBER.type,
131        validation.NUMBER.between(5000, 10000),
132      ],
133      when: [validation.$OTHER("age", validation.NUMBER.maxValue(17))],
134    },
135  ],
136  $refine: [
137    {
138      validate: [
139        validation.AGGREGATE.all([
140          validation.$OTHER("age", validation.NUMBER.lt(18)),
141          validation.$OTHER("idNumber", validation.STRING.isEmpty),
142        ]).mgs("idNumber cant be specified for under 18"),
143      ],
144      path: ["idNumber"],
145    },
146  ],
147});
I have prepared an application in Retool to demonstrate this example:

And a transformer to perform validation on the form data:

For each and every input in the form, instead of define the validation logic individually in the component, now we have the validation errors prepared and centralized in the transformer result, we can use formDataKey to get the error of the component and put it into Custom rule in Validation section.

That’s still create repetitive in the process, but that less error prone than when we specify the logic in here, when something changes, we don’t need to go and find it everywhere and update it.
Let’s try changing data in the form to see what happen to it.
The validation library is designed to be extensible. You can introduce new validation rules by defining custom logic within your schema. For instance, you can create a "between" rule to ensure a value falls within a specified range:
validation.CUSTOM({
  validate: (value) => value >= 10000 && value <= userSpecifyMaxInput.value,
  message: `${field} must be between 10000 and ${userSpecifyMaxInput.value}.`,
});The validation rules can be tailored to suit specific requirements. You can
This flexibility ensures that the validation logic can evolve alongside your business needs.
In the previous schema, the idNumber field's validation changes based on the age field. This interdependence showcases how validation can adapt based on input context.
To validate an object against the schema, use the following:
const errors = validateObject(exampleSchema(data), formData);
if (Object.keys(errors).length) {
  console.log('Validation failed:', errors);
}Schema-based validation is vital for ensuring data integrity and improving user experience in Retool applications. By defining clear validation rules and leveraging the extensibility of the validation library, developers can create robust, reliable forms. For further details, please refer to the Validation | GitHub repository for this library.
Implementing schema validation can greatly enhance your application's resilience against invalid data and streamline the user input process, making it an essential part of any Retool project.
Ready to bring your dashboard vision to life? Contact Retoolers today, and let us help you create a powerful, intuitive dashboard that meets your exact requirements.
Looking to supercharge your operations? We’re masters in Retool and experts at building internal tools, dashboards, admin panels, and portals that scale with your business. Let’s turn your ideas into powerful tools that drive real impact.
Curious how we’ve done it for others? Explore our Use Cases to see real-world examples, or check out Our Work to discover how we’ve helped teams like yours streamline operations and unlock growth.
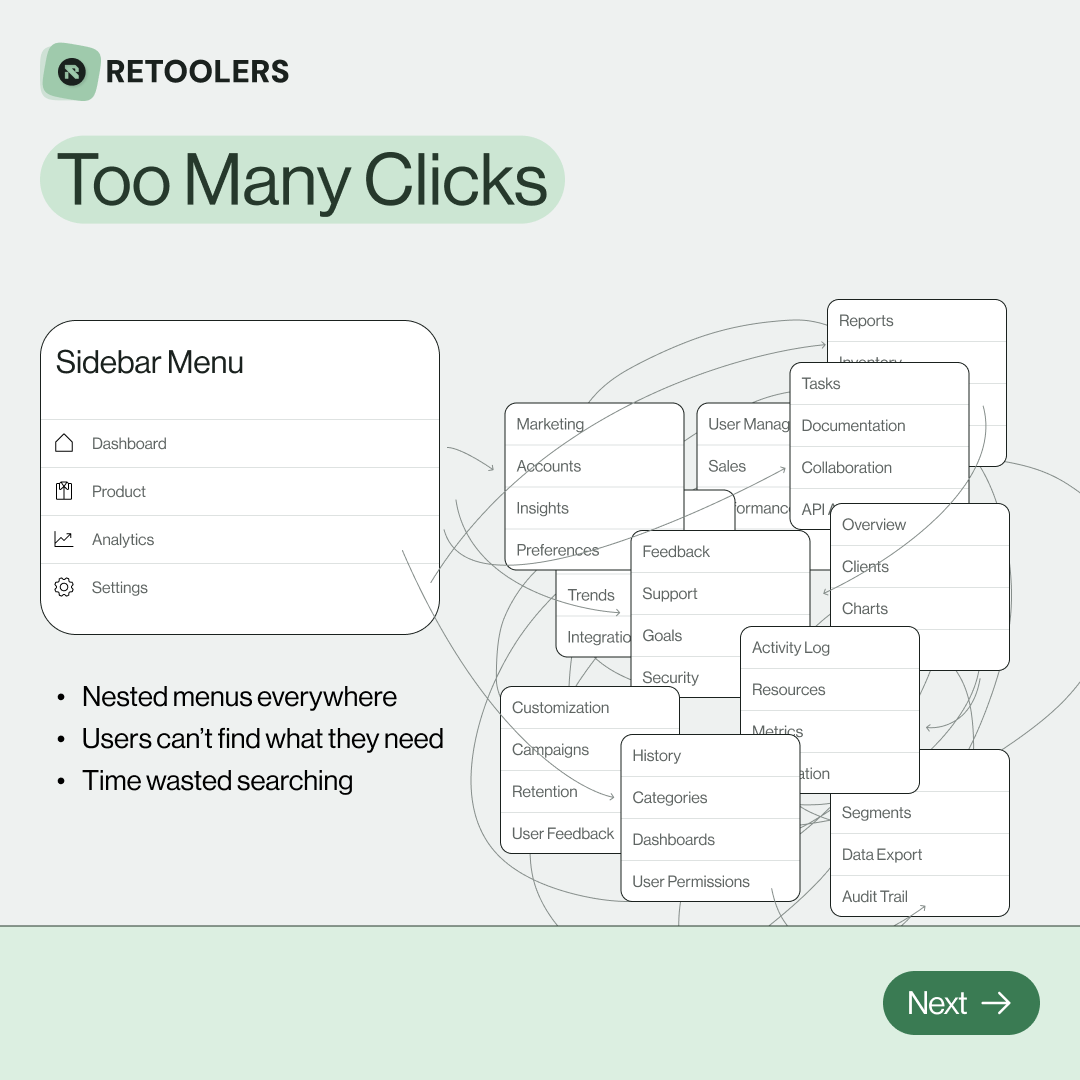
🔎 Internal tools often fail because of one simple thing: Navigation.
Too many clicks, buried menus, lost users.
We broke it down in this 4-slide carousel:
1️⃣ The problem (too many clicks)
2️⃣ The fix (clear navigation structure)
3️⃣ The Retool advantage (drag-and-drop layouts)
4️⃣ The impact (happier teams)
💡 With Retool, you can design internal tools that are easy to use, fast to build, and simple to maintain.
👉 Swipe through the carousel and see how better UX = better productivity.
📞 Ready to streamline your tools? Book a call with us at Retoolers.

🚀From idea → app in minutesBuilding internal tools used to take weeks.
Now, with AI App Generation in Retool, you can describe what you want in plain English and let AI do the heavy lifting.
At Retoolers, we help teams move faster by combining AI + Retool to create tools that actually fit their workflows.
👉 Check out our blog for the full breakdown: https://lnkd.in/gMAiqy9F
Before we quote, we help you clarify the workflow. Share your idea, process, or existing tools, and we’ll map the key requirements, suggest the right system, and create a free wireframe so you can see the solution before development starts.


